
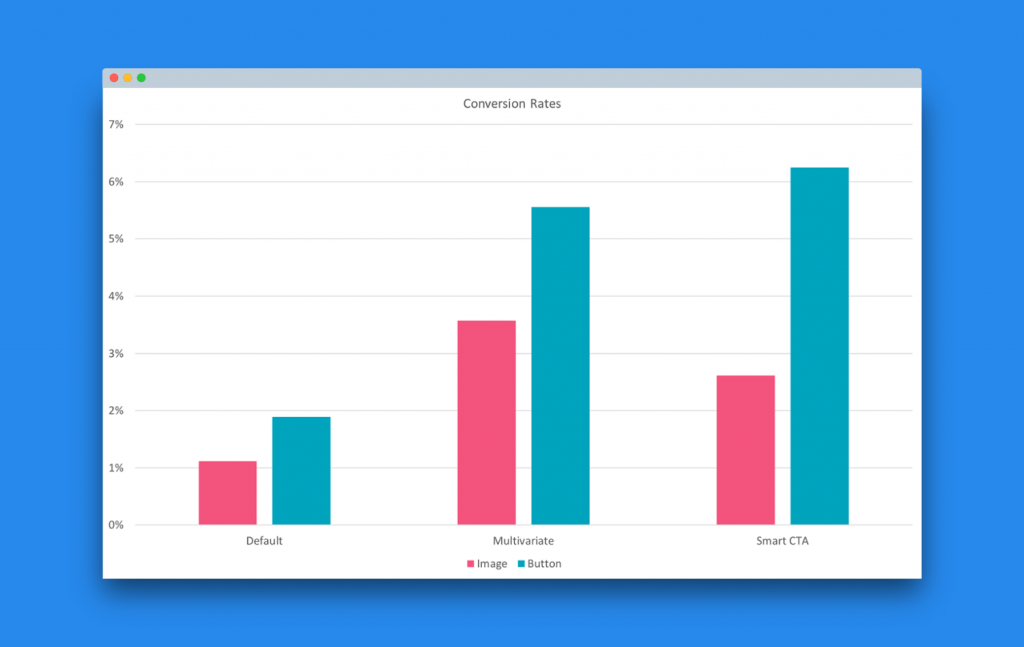
A personalized call to action converts over two hundred percent better than its non-personalized counterparts, according to new research by HubSpot.
This is a huge claim, but it’s from a big study which looked at over 330,000 calls to action (CTAs) over a six month time period. The large sample size and time period should give you confidence: this is something which works ?
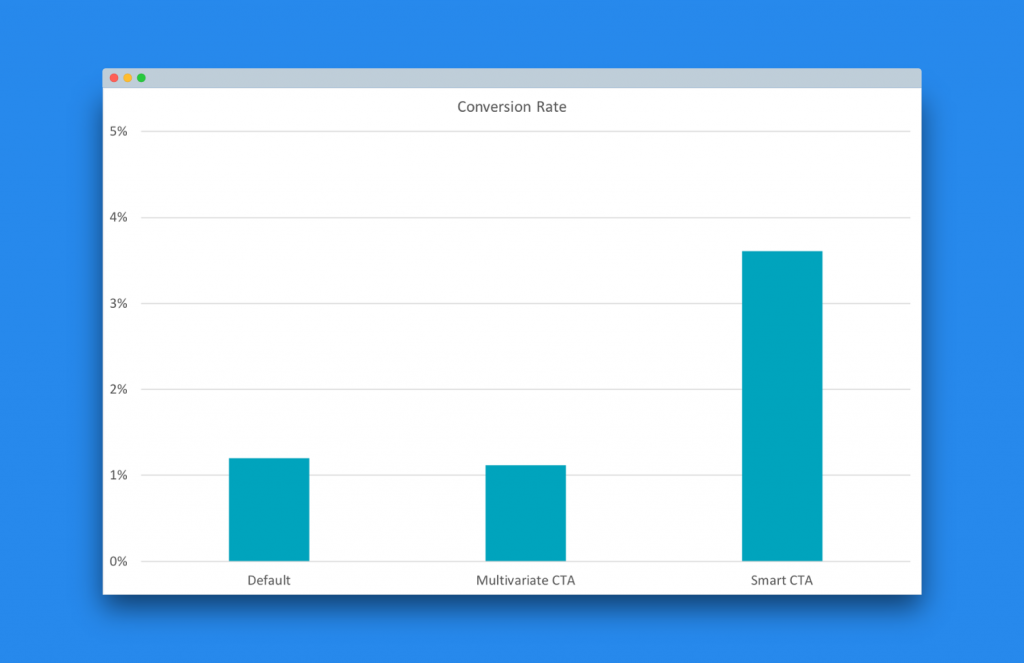
The performance of CTRs from personalized – or “smart” CTAs – vs regular counterparts. Data from 330,000 sites, compiled by HubSpot.
The secondary finding was that personalized call to action group went on to lead to a 25-45% increase in conversion rates.
Conversion rate as a result of two groups: personalized call to action, vs regular alternative. Data from 330,000 sites, compiled by HubSpot.
These are big numbers and big claims, and any with any type of website reading those figures would immediately want a piece of the action.
Yet, creating these kinds of personalized calls to actions has hitherto been possible only with enterprise tools on enterprise sites – think Amazon’s personalized recommendations or Netflix’s personalized home screen. Indeed, even readers of the HubSpot study would be left curious and frustrated about how to make these huge gains in practice.
Fortunately, Logic Hop is a game changer here, making it easy to do personalized marketing on WordPress sites.
You can pull in data from a whole range of sources – from third party tools you’re already using like ConvertKit, Drip, or Facebook Ads – or just personalised based on where a user has come from or their activity on your website. It’s powerful stuff, and it gives you access to the huge conversion rate gains that come from personalization.
This post will get right to it, showing you how to implement personalised marketing and personalized call to actions on any WordPress site.
How to start your personalized marketing journey
You’ll need to start off by getting Logic Hop, your personalized marketing plugin. Plans start from a very reasonable $19/month. You can then install the plugin from the WordPress plugin repository, and connect the API key available from your Logic Hop account.
Installation should be easy, but if you need any help getting started see full details and a video tutorial here.
Establishing how to segment your audience
We can now start the fun part: deciding how to put our personalization into practice. I’ll be using a real-life site, popular WordPress tutorial blog WPShout.com as an example here.
WPShout is monetised by selling premium courses, and this is where we’re going to focus.
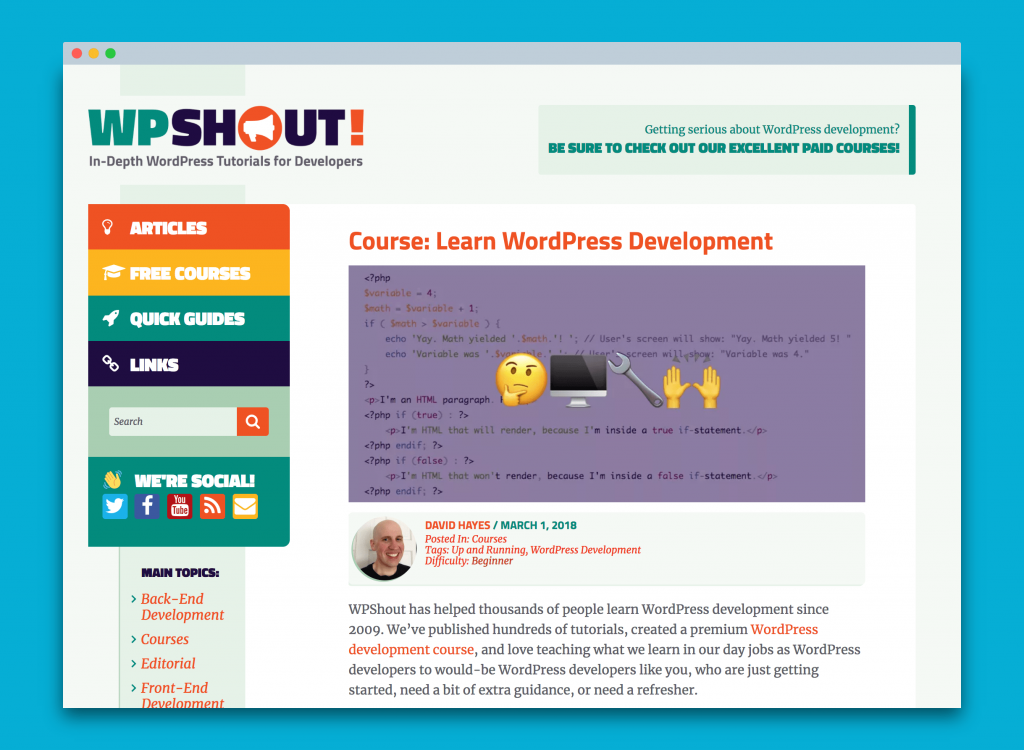
A key funnel is the free WordPress development series, which promotes a premium course on the same topic. This is series is made up of five posts, and readers often find the series via search. WPShout’s premium courses follow on nicely from this free series.
Search visitors typically haven’t visited the site before, so need to build trust before we can make a sale. As a search visitor reads more of the course content, this trust is built. We’ll keep that in mind for personalization.
We thus have our segmentation:
- New visitors
- Visitors who have read other parts of the series (new or repeat)
We can use Logic Hop’s conditions and goals to set these up. We’ll default to New visitors, so we just need to set up visitors who have read other parts of the series.
Creating your first Logic Hop conditions
Logic Hop conditions are how we’re able to personalize content on our WordPress site based on user actions, data, or referrals. Here we want to be able to create a condition which will let us personalize if the user has read any of the other parts of our series. We’ll call this group Learning WordPress development.
Setting this up is very simple: go to Logic Hop → Conditions → Add New and set up a new condition with If, Specific Page Views – All Visits (this can also be done for the current session if you prefer), then start typing your post title. Logic Hop will find the post for you.
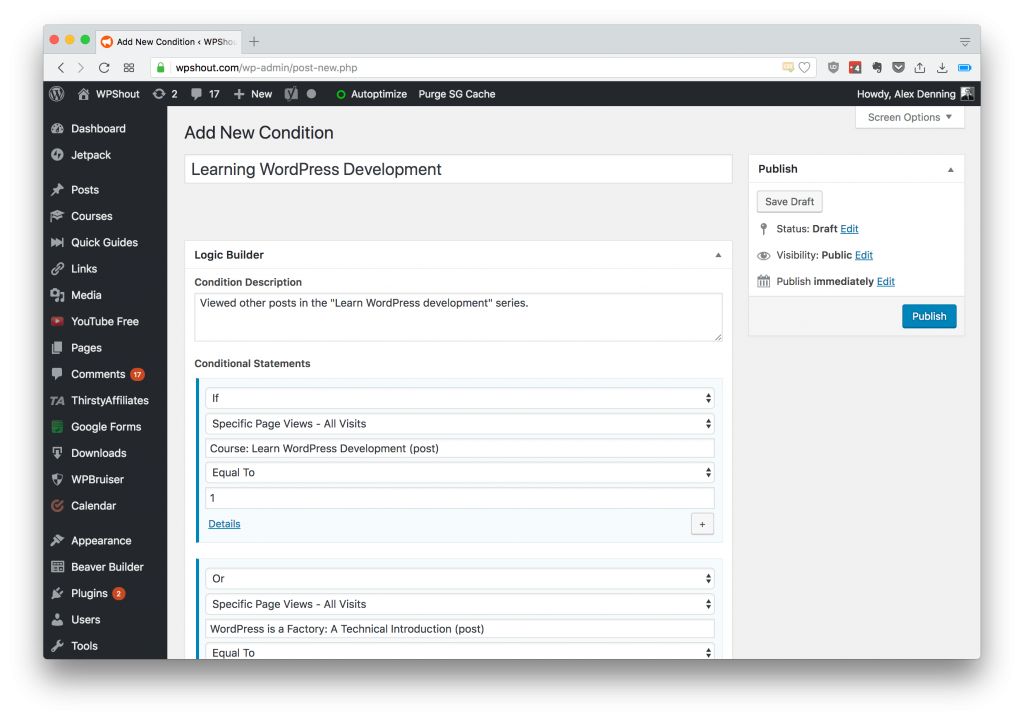
And finally, set Greater Than Or Equal To, 1. This will trigger the condition if we have at least 1 page view. We’ll then set an “or” additional condition with the next post, so that the condition will trigger if any of the other posts have been viewed. Repeat this for all the posts in the series.
When done, hit publish and Logic Hop will create the condition. This handles visitors who have read other parts of the series.
Creating our personalized call to action
We’re now ready to create our personalized call to action, and enjoy the doubling of our click-through rate!
Putting Logic Hop into practice is remarkably easy: head to the WordPress post or page you want to edit, and load either the WordPress editor or the page builder you’re using (if you’re writing code, Logic Hop works here too!). In my example we’re using the standard (pre-Gutenberg) WordPress editor.
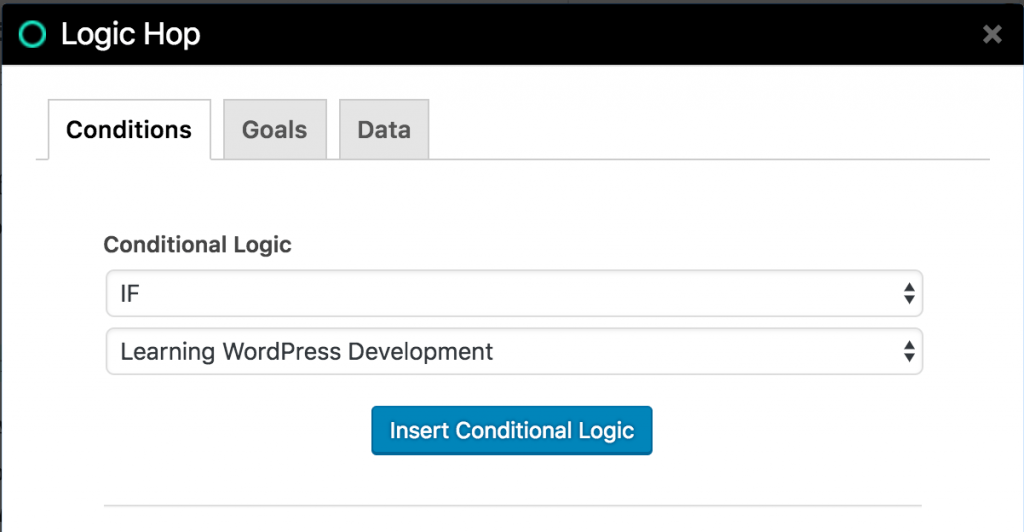
Once in the editor, doing the personalization is super-simple: add a line break where you want to personalize, and press the Logic Hop button. Then, set the conditions and you’re good to go.
There are two sections I want to personalize on these posts:
- The call to action for Up and Running, the paid course: this displays an ad for the paid course. We want this to show a stronger CTA for visitors who’ve read other parts of the series.
- The menu for the rest of the series: this lets you navigate to the rest of the content. We can change the messaging for visitors who’ve read other parts of the series.
Creating a personalized call to action in WordPress
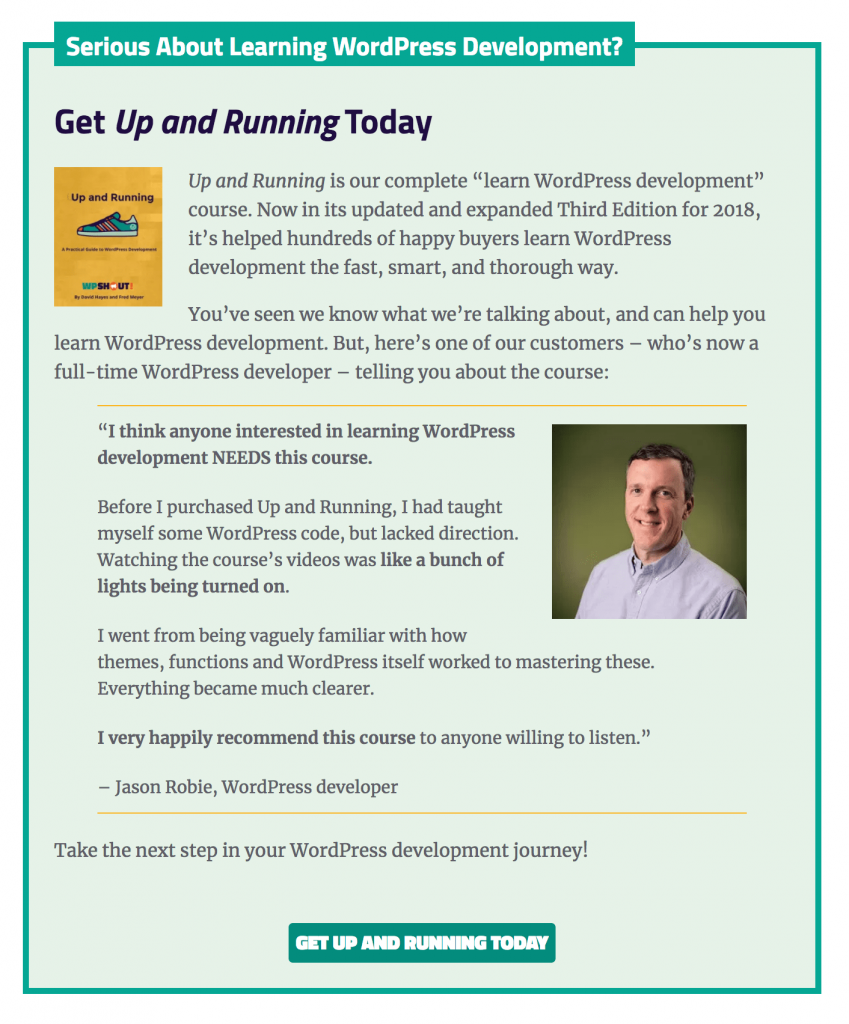
We’ll start with the first! The call to action is built with a custom shortcode, so we’ll start by writing out the extra text we want to display. In this case, it’ll be a testimonial which adds extra detail. We can leverage that we know the reader has already read some content when crafting the copy, for a more effective personalized call to action.
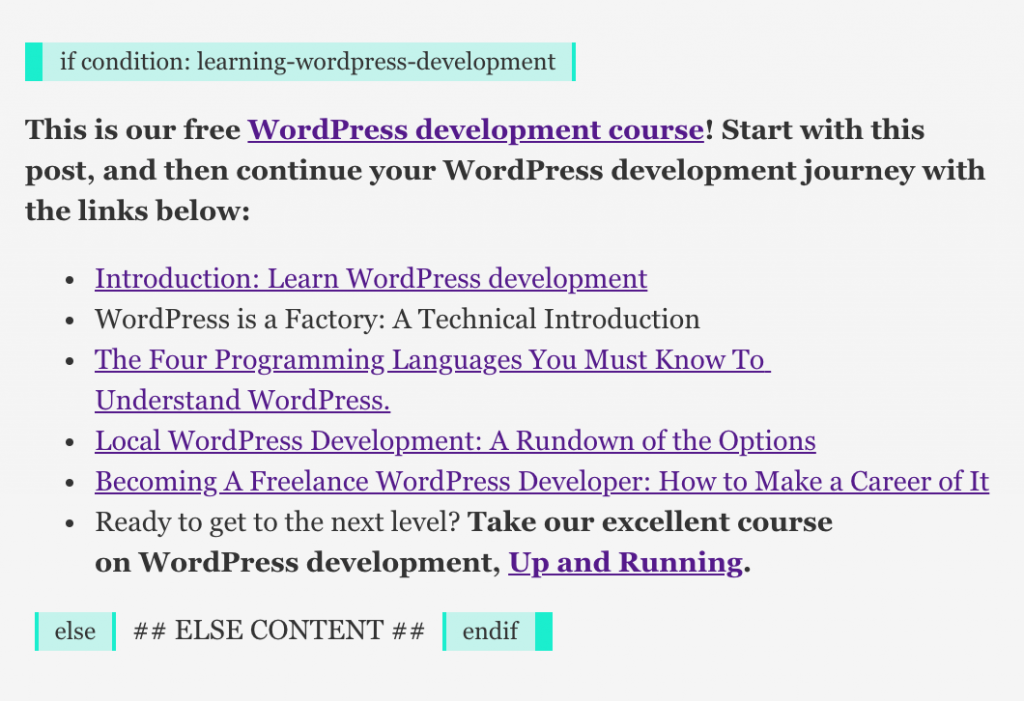
We want to personalize this call to action based on whether the condition learning WordPress development is met. If the condition is not met, nothing happens. Doing this is super-simple: select the extra text you want to personalize, and then select an IF condition on learning WordPress development. Insert Conditional Logic, and you’re all done.
We can now update the post, and in if I preview in my browser I’ll see the full copy as I’ve already viewed other parts of the post:
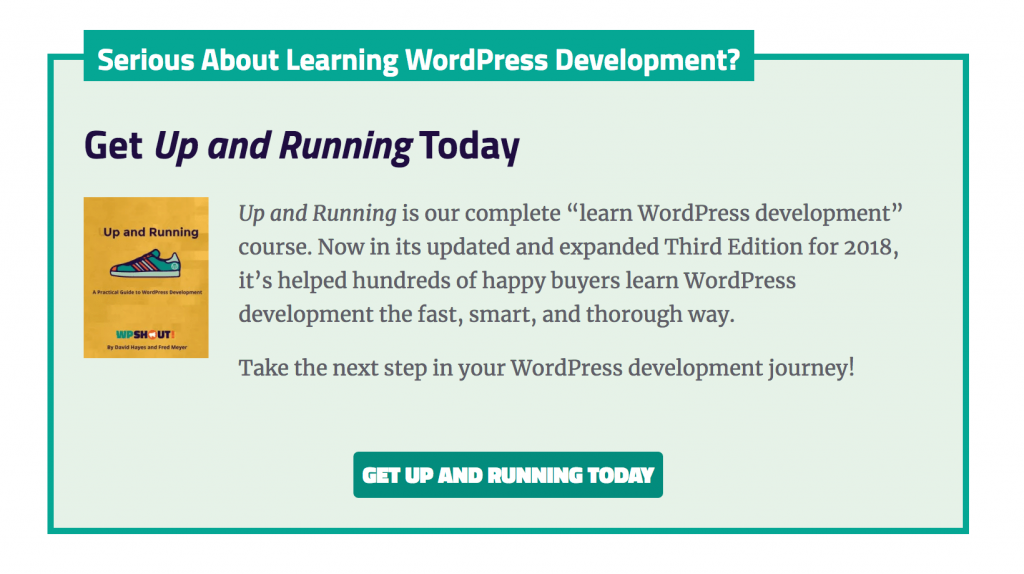
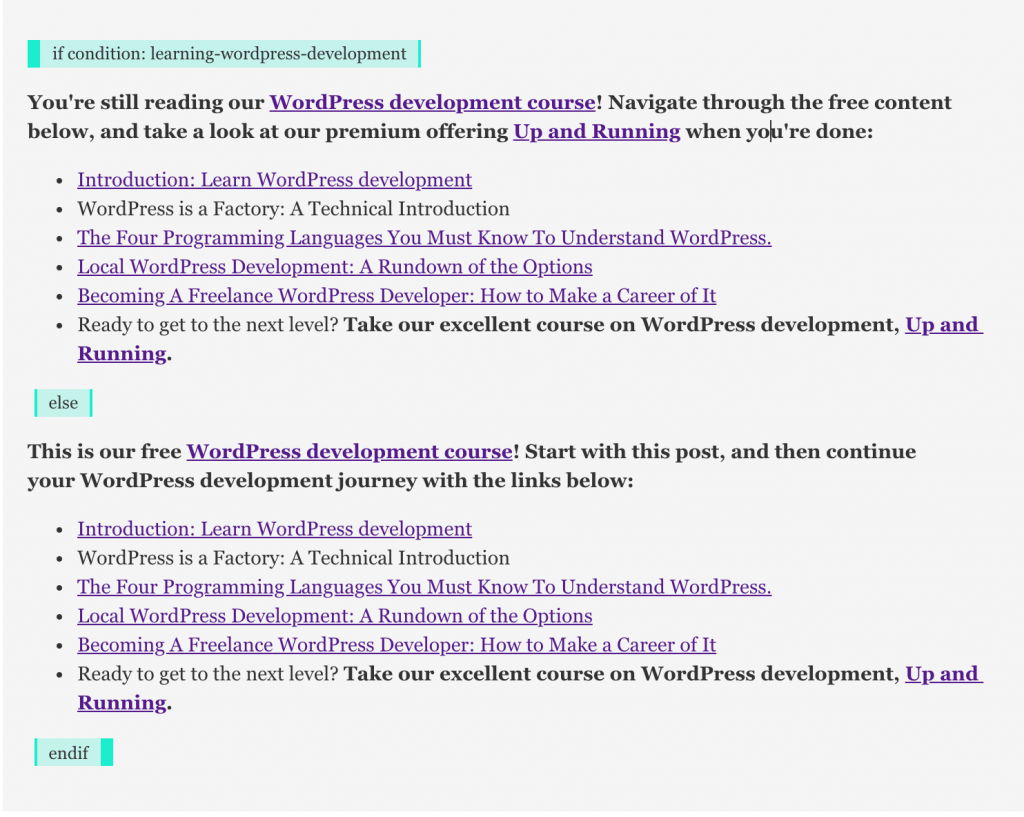
And if I open up the same page in an incognito window (thus making me a new visitor), I get the condensed version:
If I then use the menu to click-through to another part of the series, and come back to the post I’ve added the condition to, I’ll get the full promotion showing.
Pretty clever, eh? And the perfect way to increase the conversion rate based on user actions: “hotter” leads get a stronger sales pitch, and fresh leads get to enjoy the content without promotion – thus seeing WPShout is good! – and will see the promotion once they’re clear about this.
Personalizing the user experience based on site actions
The second bit of personalization isn’t related to the call to action, but will improve the user experience and keep readers flowing through the free content. As we’re expecting readers who consume more free content to have a higher propensity to convert, this is still going to give us revenue benefits.
Each post in the series has a menu which points you to other posts in the course. We want to use the same Learning WordPress development condition here to personalize the content based on if the visitor has or has not visited other content in the series.
We’ll do this, as before, by selecting the text we want to personalize and clicking the Logic Hop button. This time, we’ll select IF / ELSE and Learning WordPress development as we want to show one bit of content if the visitor has read other bits, and totally different content if not. Insert conditional logic, and you’ll have the if and else conditions added.
You can now tweak your copy for the two conditions! I want these to be similar, so I’ll start by copying-and-pasting the original text in to the else space, and then making my changes. As before, I’ll leverage that I know if the user has read other parts of the course, and if so I’ll push the paid course more forcefully. This is shown below:
Again, Update your content, and try it out! As with the call to action box, you now have a powerful way of personalizing your website, and delivering a higher conversion rate.
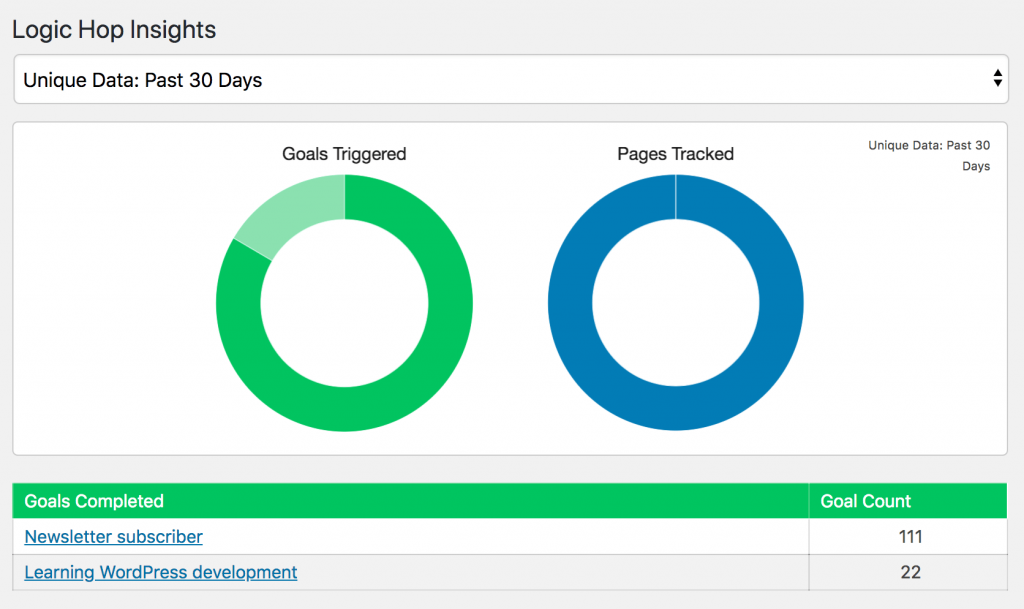
Putting this into practice is now a matter of copying and pasting the conditions to the rest of the content in the series, and watching the conversions roll in! Logic Hop has an Insights page which will let us track the usage of the conditions across the site:
You could also revisit this in future to personalize based on which specific posts have been viewed, or even use Logic Hop Goals to store that a visitor is learning WordPress development, and use that to personalize the homepage, any other content on the site, or even feed that back to the site’s email marketing platform to personalize which email campaigns the visitor receives.
Once you start thinking about how personalized marketing can make your site more effective, there are all sorts of use cases: on WPShout, for example, we’ve gone on to use Logic Hop on the homepage, the sales page for the paid products, and the sponsor page.
Logic Hop is extremely easy to get started with, but can also handle everything you’d want to do with content personalization.
Get your 200+% more effective conversion rate today
You’ve now seen that personalized marketing is more effective – over 200% more effective, according to the huge HubSpot study cited up top – and how to use Logic Hop to put this into practice.
You’ve seen how easy it is to start your personalized marketing journey by identifying content which can be more effective, and then how to create Conditions to segment these. You’ve then seen how to put these into practice with the simple Logic Hop editor.
We’ve used a real-life digital product example here, but the use cases for this are limitless: whatever your WordPress site does, Logic Hop can make it more effective. Digital products, WooCommerce stores, B2B sites, and agencies can all benefit from personalized marketing.
All that’s left, then, is to get your imagination working on how this can work for you or your clients. Or, book a demo with us and we can give you some ideas.
And when you’re done, get Logic Hop today. More leads. More conversions. More sales. Logic, Automated 🙂

